Official background image from the Kaggle competition
Kaggle's winning solutions for Melanoma Detection - Part1
Discover the techniques that allowed the Kaggle Grandmasters to win this competition
Acknowledgements
This series is a review of the Grandmaster Series from NVIDIA. The goal of this blog post is to break down all the key findings described by the Grandmasters. You can find the original Youtube video here.
This is Part 1 of 3 of this series. The first blog describes the pre-processing methods used, designed by a Grandmaster Kaggler called Chris Deotte which won a Gold medal.
Part 2 will review the solution of the #1 ranked submission on the private Leader board from Bo and his team.
Part 3 will review the solution of the #11 ranked submission on the private Leader board from Giba and his team.
So feel free to skip this blog and jump straight to the solutions.
1. The Competition
This is a binary classification problem where candidates should train a model to classify if an image is cancerous or not. The dataset was provided by SIIM & ISIC. The Kaggle Competition had the following characteristics and challenges:
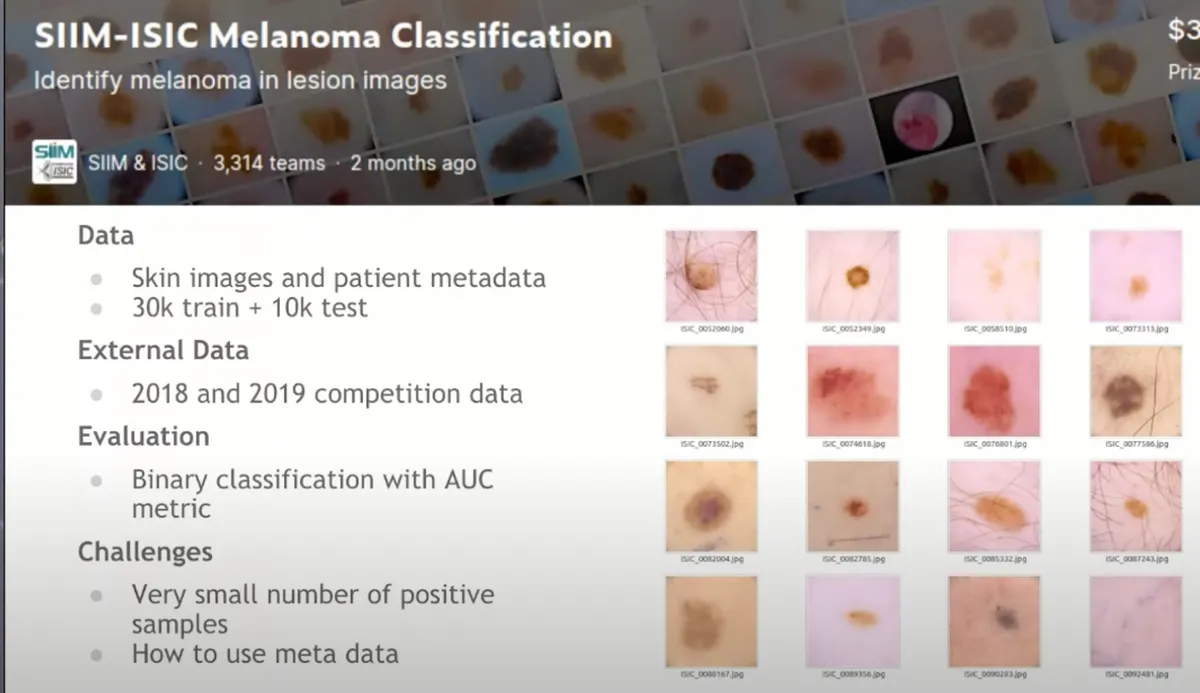
- the dataset was really large in size (32 GB)
- different image sizes, some of which were 4000x6000 pixels.
- 33K training images + 11K test images
- Additional 60K data
- Unbalanced dataset 1.8% positives
- Metadata to figure out how to incorporate them in the model
2. Data Pre-processing
The pre-processing step was really crucial in this problem since the images were quite large and contained more information than was actually needed.
Chris Deotte, another Kaggle Grandmaster who participated in this competition, spent a lot of time pre-processing the dataset and his notebooks won a Gold medal since a lot of teams used his techniques for their final submission.
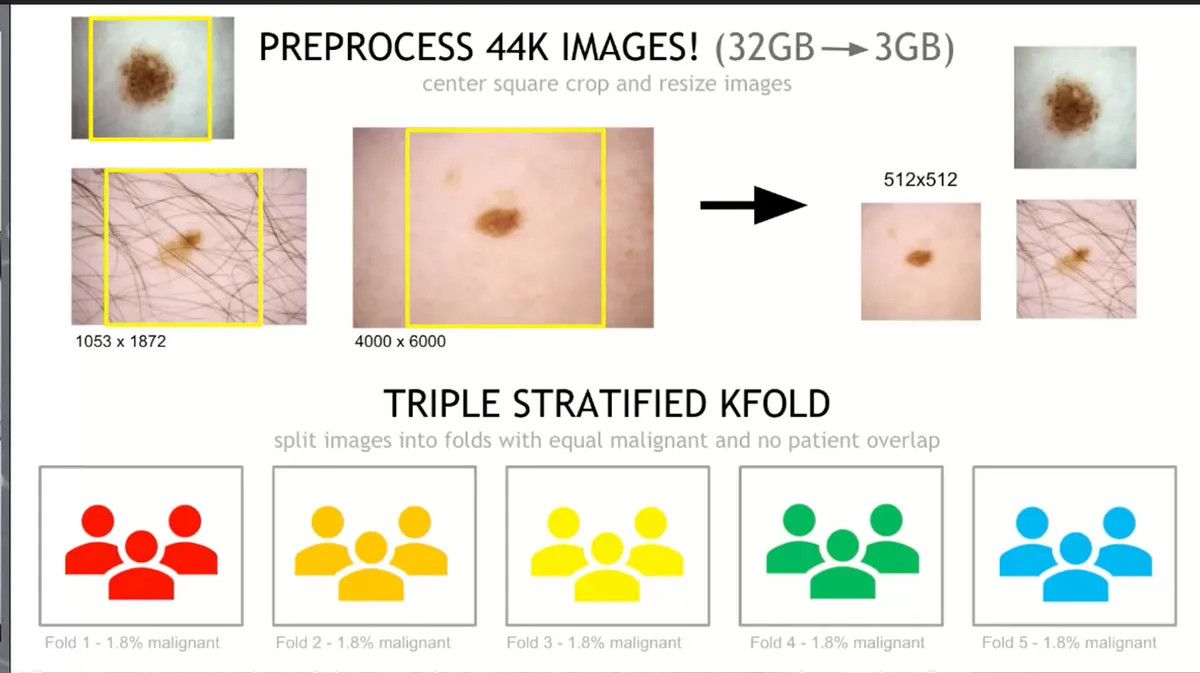
As mentioned above, the dataset was quite large (32GB) and the images had different sizes. So Chris decided to do the following:
- Centre crop them, take the largest square in the middle
- Resize the image to a fixed shape
This technique brought down the size of the dataset from 32GB to 3GB when the images were resized to 512x512. Keep in mind though that Chris provided more datasets with the images resized in different shapes:
- 1024x1024 TFRecords with targets, meta, and sample submission (8.9GB)
- 768x768 TFRecords with targets, meta, and sample submission (5.3GB)
- 512x512 TFRecords with targets, meta, and sample submission (2.6GB)
- 384x384 TFRecords with targets, meta, and sample submission (1.6GB)
- 256x256 TFRecords with targets, meta, and sample submission (800MB)
- 192x192 TFRecords with targets, meta, and sample submission (500MB)
- 128x128 TFRecords with targets, meta, and sample submission (240MB)
Best practise: It is wised to create an ensemble of models trained on different sizes so you can include diversity on the final predictions
You can read more in his notebook here
2.1 Triple Stratified k-fold#
His main idea revolved around k-fold cross-validation. This is one of the best practices in Data Science projects since you ensure every observation from the original dataset has the chance of appearing in the training and test set. This results in a less biased model and the performance will be the average score across all K-folds.
However, since the data is not balanced at all, less than 2% of our data were actual Menaloma images, we have to ensure our Folds are balanced and containing the same amount of labels across all folds/groups.
2.1.1 Stratify 1 - Isolate Patients#
- Break the images into say 5 different groups
- Many images came from the same patient, so you have to be careful to make sure all of those images are within the same fold
2.1.2 Stratify 2 - Balance Malignant Images#
- Also, there is a very low percentage of positive targets
- Make sure each fold/group has some positive targets
As you can see from the image above, when Chris used 5 folds, he made sure that 1.8% of the data were positive targets
2.1.3 Stratify 3 - Balance Patient Count Distribution#
- Some patients just have a few images whereas some others had a lot
- You want to make sure each fold had a good selection of both types of patients
2.2 Remove duplicates#
The competition provided an additional 60K images. Some of them were exact duplicates from the training set, so we have to make sure we remove them because this is a big problem for the Deep Learning model.
Warning : Having duplicate images in your training set might lead to a more biased model since the Neural Net will have more chances to learn patterns for those specific images, hence it will decrease the chance of your model to generalize to new images
This is not a trivial problem since we don't only have exact duplicates in our dataset, but also near duplicates. Those are images that can be slightly different, maybe rotated or scaled, but really similar to other images. So in order to detect near-duplicates, it's not as easy to just compare each image pixel by pixel.
Warning: In addition, having near duplicates both in your training and validation data set, will lead to higher validation score which is misleading since the model has already been trained on the same image and the validation score will not reflect the whole truth.
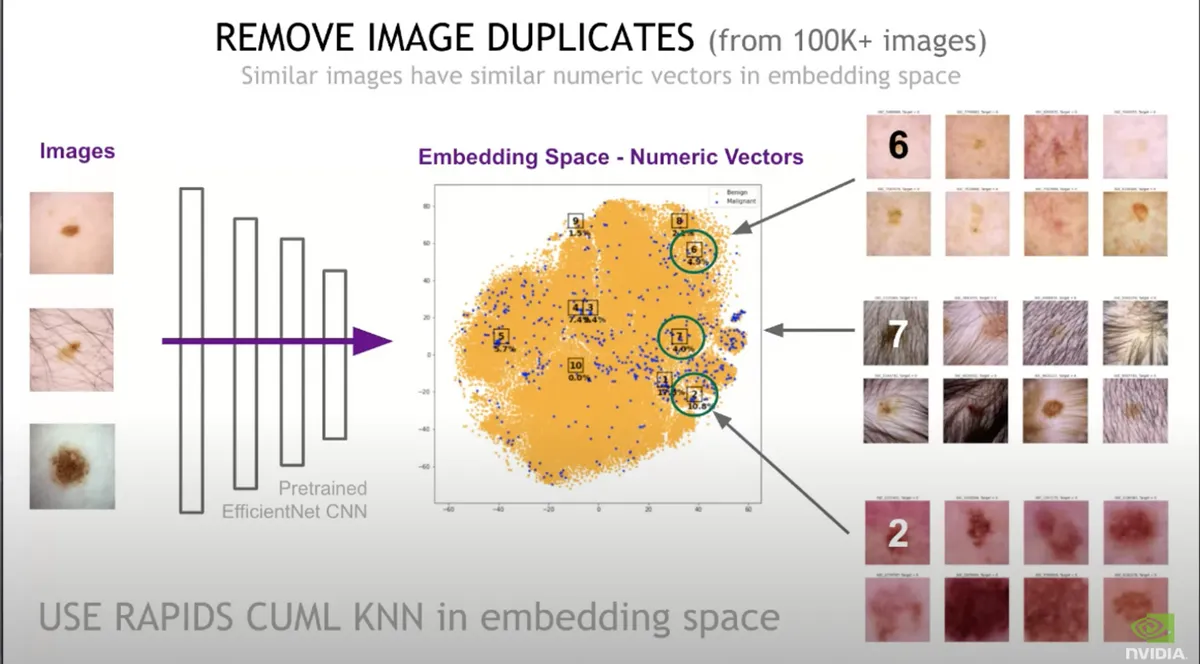
In order to remove the duplicates Chris applied the following steps:
- Took all 100K images and push them through a pre-trained CNN. The new output is a vector (let's say the size is 1000)
- Used a clustering technique called KNN to compare those numeric vectors with each other
- By reducing the vectors to 2D using t-sne, he plotted the images on a 2D graph and it turns out that near-duplicate images had similar vectors.
- He examined the images which vectors were similar and removed hundreds of images that were actually identical
3. Conclusion
Chris' approach to pre-process the data and create balanced groups of data was really popular at the time of the competition. It helped a lot of people out by making a more reliable validation set.
If you are wondering why I haven't included any Data Augmentation methods is because every team used their own approach so those will be discussed on the other 2 blogs of this series.
If you want to check Chris' methods, you can find his started notebook with his own augmentation methods and solution here.
